Our Family

Our Family

Wednesday, October 30, 2013

A Day in the Homeschool Life of My 1st and 2nd Graders

The other day on my Facebook page we had an interesting conversation about how the public school system's expectations of children are so unreasonable, which is one of the things that is leading to this explosion of Ritalin and other medications being given unnecessarily to so many children.  In a homeschool setting, you have the ability to dictate how much time you spend on each subject and what is considered acceptable behavior for your children during school time.  I am often asked by people interested in homeschooling or just getting started how much time I spend on school in my homeschool, so I thought it would be fun to show you "A Day in the Homeschool Life" of my children at their various age ranges starting with my 6 and 8 year olds who are in 1st and 2nd grades.

Last year I did a review for a company that recommended you spend 2 to 2.5 times the child's age per subject per day.  I thought this was a very reasonable number, and usually stay close to this guideline unless of course we are working on something they are so delighted with and into that we keep working.

Our school day starts at 9:30 every morning.  The time in the morning before 9:30 is spent getting up and ready for the day and completing morning chores.  When the "early birds" wake up, they are allowed to watch television until it is chore time.  My 6 year old helps feed and water chickens for his morning chores in addition to getting himself ready and taking care of his breakfast dishes, and my 8 year old feeds and waters the cat.

At 9:30 we start our day with our Bible Lesson and Scripture memorization. This usually lasts 15-20 minutes.  For Scripture memorization we are using My ABC of Bible Verses learning a new verse every week starting with a different letter of the alphabet.  Our Bible Lesson is from Bible Study Guide For All Ages which includes timeline work, studying the different books of Bible and a coloring sheet with a different Bible story every day.


After Bible it is time for our read aloud.  I read aloud to all the children daily from a chapter book for 15-20 minutes per day.  The younger children are allowed to draw or play quietly while I read.  The books we are reading are suggested by the American History curriculum I am using with the older boys.

Christian drawing a picture

Anthony playing a fishing game he made while I read


After I am finished reading, they are excused.  Often they will go upstairs and build Legos or on nice days they head outside.

Unless of course it is a science day and we are doing some fun experiments.  Then they stay and participate. We do science on Tuesdays and Thusdays.


After lunch they get plenty of time to run and play outside.


We have been watching an episode of Liberty's Kids everyday to help "bring to life" what we have been learning about in history.  Those episodes are about 20 minutes long.

After that they still had a few minutes before afternoon school work.


Afternoon school work starts with Math.  All of my children use Math U See. Christian is in Alpha and Anthony is in Beta.  It usually takes 10-15 minutes for them to finish.


Next up is writing.  They are doing copywork from IEW PAL.  It only takes them a few minutes to do a page.

The boys do spelling and reading  together.  We are using All About Spelling/Reading.  The spelling part takes about 15 minutes and then each of them reads a short story out of the reader.


We read a few articles together out of God's World News Early Edition.  This takes about 10 minutes.


To finish out their school day, they practice handwriting on the Wet, Dry, Try app from Handwriting Without Tears.


So that's about it.  A day in the homeschool life of my 6 and 8 year olds.  Around 40 minutes in the morning and 1 1/2 in the afternoon at the most counting 20 minutes of educational TV.

This still leaves plenty of time for building forts, inside on rainy days.


*link to All About Spelling/Reading is my affiliate link.  I only form affiliate relationships with companies whose products I actually use and can recommend.
Schoolhouse Review Crew: EEME

Recently we had an opportunity to review Project Genius Light from EEME.


 photo logo_eemeco_zpse0c72040.png

EEME was founded by a dad who was unhappy with the choices of educational toys available.  He wanted to find things for children to do that would not only be fun but also instill the deeper knowledge of how things work, get kids to ask "why", and be able to teach others.  Soon EEME was born.

EEME is a series of hands on projects for 7-12 year old that are designed to teach them how to build technology around them.  It is a subscription program in which you are shipped a project kit in the mail every month on the 1st of the month or the next business day.  Each month's project builds on the one before it. You will reuse some of the previous month's components, such as the breadboard and the battery pack, plus receive whatever new pieces you need to complete the project in that month's kit.  The projects are taught step by step by watching online videos.  There are even interactive quiz questions included in the online instruction.

There are 5 different monthly projects in an EEME subscription.  They are:

Genius Light-22 lessons-assemble a LED circuit system that lights up when it is dark and dims when it is light
DIY Display-33 lessons- segmented LED's wire up a personal switch panel
Tentacles-26 lessons-learn about transistors
Fade to Black -15 lessons-learn about capacitators and build a dimming light circuit that stays lit even when battery is disconnected
Tune-16 lessons-learn how to use a potentiometer and transistor to make a tunable Genius Light

A subscription costs $18.95 per month.  You can subscribe by clicking here.   You can subscribe to the online video lessons for free by clicking here.


We received the first project Project Genius Light
 photo project-lights-mr_zpsd5336475.jpg


I used the Project Genius Light with my 11 and 9 year old boys.  We split the project up into two sections completing 11 lessons the first session and the rest in the second session.  I sat with the boys as they completed the project, but honestly I didn't help do anything, they did it all on their own and took turns as to who was doing the project work for each step.


One of the first things I really liked about EEME was that everything we needed came with the project.  I did not have to buy or add a single thing to it.  It even came with the battery. The quality of the bread board and the baseboard were very good.  I thought that the video instruction did a great job showing and telling the boys exactly what they needed to do.  Parents do not need to have any electronics or engineering experience at all, the videos teach everything the child needs to know.  If it took the boys a little longer then the instructor to put the wires into the necessary slot in the bread board, it was very easy to pause the video until they were through and then start it up again. There are also written notes beside the video if you need to double check where the wires are supposed to be placed.  I really liked that it got the children working in the project right from the start without giving a whole lot of background information.  It got them interested right away, and then after they had a chance to do complete a section, they gave a good explanation for the hows and whys.  I also liked the questions that were woven into the lessons to show whether or not the boys were understanding what it was they were learning.

They were very excited that it lit up the first time they tried!


We had a bit of work to do to complete the project after that, but the boys were excited that had followed the directions correctly and it lit up.

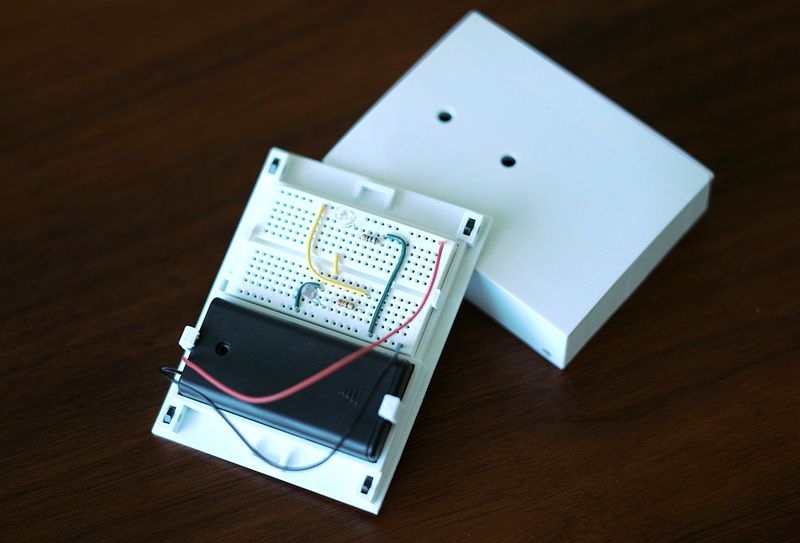
The finished project looked like this.  I did not remember to get a picture of the bread board before they closed it up.  The genius light works just as it is supposed to.


The only difficulty we had was when we got to a good stopping point after our first session I logged out and thought it was supposed to save our place where we left off in the video instruction.  When we logged back in though it did not start us where we left off.  I had to figure out which video segment we watched last and restart it from there.

The boys really enjoyed completing the Project Genius Light from EEME.  To see what my Crew Mates had to say, click on the banner below.


Photobucket

Monday, October 28, 2013

A Field Trip to the Bee Farm

A very nice family who raises honey bees on their farm offered to do a field trip for our homeschool group to their house and planned some fun activities for us while we were there.

First, their daughter who is a junior beekeeper did a talk for us on beekeeping and showed us all of her equipment, including her suit.


After the young lady finished her talk, we had an opportunity to try out some lip balm, make beeswax candles, and a candy made from honey and sunflower seeds.


Then we made a fun craft using egg shells filled with confetti, rolled up newspapers and streamers.


We also go to go outside and see their chickens and the bee hives (from a distance.)  It was a fun, and educational inexpensive field trip.

Sunday, October 27, 2013

Schoolhouse Review Crew: Rosie's Doll Clothes Patterns

 photo rosies2_zpse8168139.jpg

I like to sew, but my skill at sewing is less than fantastic.  Often when I am reading the directions for a pattern, it is like I am reading a foreign language and I do not understand it at all.  I was excited to have an opportunity to review the Learn How to Make Doll Clothes Video Course With 8 Free Doll Clothes Patterns from Rosie's Doll Clothes Patterns.
 photo Rosies_zpsc853bd7c.jpg


The Learn to Make Doll Clothes Video Course With 8 Free Doll Clothes Patterns is for children and adults ages 8 and up.  This course contains over 130 step by step instructional videos that will take you through everything you need to know about sewing doll clothes.  The videos are split up into 6 weeks worth of lessons.  For each week there are 6-7 main topics with several videos to view under each main topic.  The videos start with an introduction to sewing doll clothes and setting up your sewing room, and progress into topics such as: knowing your fabric, working with fabric, how to straight and zigzag stitch, sewing a hem, cool tips and tricks for working with doll clothes,  creating casings, tubes, and straps, how to gather, how to attach trimmings, and many, many more.  You can work at your own pace and progress as rapidly or as slowly as you need to.

 photo doll-collage-large_zpscbbc4c2d.jpg

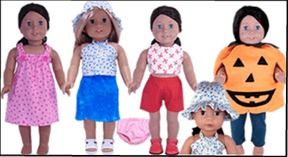
To go along with the sewing course, you receive 8 free doll clothes patterns for 18 inch American Girl dolls:

Sports Shorts
Crop Top
Sarong
Halter Top
Summer Nightie
Hat
Pumpkin
Underpants

You can download the patterns and written instructions to your computer.  In addition to the written instructions, there are videos that take you step by step through the process of making the doll clothes.  The number of videos varies depending on the pattern, but each set of videos takes you through the entire process of making that particular piece.  These patterns are also split up into 6 weeks.

There are 3 different options for purchase:

Option 1: online access delivers the course one module at a time over 6 weeks.  You will have the option to go back and rewatch any videos as often as you would like.  You keep access for 12 months. $47.85

Option 2: online access :Immediate access to all of the modules for 12 months. $47.85

Option 3: You can purchase the course on DVD and it is yours to keep forever $67.02

Click here for ordering information.  Pricing may vary as the vendor is in Australia and the exchange rate changes.

I have two little girls (4 and 2), and I thought it would be fun to be able to make some clothes for their dolls. I do have some basic sewing skills, but have a hard time reading and understanding patterns.  Usually I have to make several mistakes before I finally figure out what they mean.  I had never attempted sewing doll clothes before.

The first thing I did was download the free patterns to my computer so I could take a look at the supply list. We live over an hour away from any stores that sell material and if I needed to buy any, I would have to order it online.  Luckily though, we had several different kinds of material that was leftover from various projects, and I didn't have to buy any!  I did have to buy some elastic, velcro, and some thread, but all of those were available inexpensively at our local Walmart.

Then I went through and watched several of the videos in one sitting.  The videos do not assume any prior knowledge, so even a very beginner can be successful with this course.  For those who do have some basic sewing knowledge, you can pick and choose which videos you want to view.  Many of the videos are at or around 5 minutes, so you can view several at a time if you choose.  Or, especially if you are working with young children you can view a video and then practice the skill that you learned.

After watching several of the course videos, I decided I would try out the first pattern, the sport shorts.  Since I already know how to download and print things off of my computer, I started printing the pattern and skipped watching the video on printing patterns.  Wrong idea!  When I printed the pattern, I measured the line like you are supposed to to ensure it printed correctly.  Mine did not measure the length it was supposed to.  So I went back and watched the video.  My printer's default setting was shrink to fit instead of actual size.  Once I fixed that the pattern measured the correct size.

I really enjoyed watching the videos for the patterns!  It made so much more sense to me to see what was being done rather than trying to figure it out with written directions.  Each part is demonstrated step by step with clear, concise instructions, and good camera views.  If I needed more time than Rosie used on the video, I could just pause it, or if I wanted to make sure I was doing it correctly, I could back it up and start again.  I love all the little tips and tricks that Rosie teaches in order to make sewing doll clothes easier.  Just a bit of advice, when she says press the hem, you should.  It saves a lot of time.  I feel like I have learned a lot over the last several weeks.  The videos made making the doll clothes so easy!

Of course with 2 girls, I have had to make two of everything.  And they waited right beside the sewing machine for me to be done!  So far I have made the sport shorts, crop top, sarong, and summer nightie. My girls have been very impressed with the clothes that mommy has made for their dolls so far.  Next up is the halter top and then Lily really wants me to make the panties.

crop tops and sport shorts


Lily's summer nightie

Emmie's summer nightie

I still need to make a matching shirt for this sarong, but the sarong turned out great!

the short sarong


To see what my Crew Mates had to say, click on the banner below.


Photobucket